

Configurable Artifacts: Deploy Code Like a Pro
When a project team grows, feature deployments become more frequent. Automating these deployments then becomes critical to optimize the development workflow. In my opinion, the best practice is artifact-based deployment, a lifesaver process that I use as much as possible. It's quite popular, and part of the The Twelve-Factor App pattern.
This article illustrates artifact-based deployment in simple terms, through a practical example.
This article was published on marmelab.com
What Is A Deployment Artifact
Artifacts aren't a new thing, but like every good practice, it's better when written down.
A deployment artifact (or a build) is the application code as it runs on production: compiled, built, bundled, minified, optimized, and so on. Most often, it's a single binary, or a bunch of files compressed in an archive.
In such a state, you can store and version an artifact. The ultimate goal of an artifact is to be downloaded as fast as possible on a server, and run immediately, with no service interruption.
Also, an artifact should be configurable in order to be deployable on any environment. For example, if you need to deploy to staging and production servers, you should be able to use the same artifact.
Yes, you read that right: Only the configuration must change, not the artifact itself. It can seem harmful or difficult, but it's the main feature of a deployment artifact. If you have to build twice your artifact for two environments, you are missing the whole point.
The Example Project: a Basic Proxy
Let's take an example project to deploy. I'll write a basic HTTP proxy, adding a random HTTP header to every request, in Node.js.
Tips: The code is available in this gist.
First, install the dependencies:
$ mkdir deployment-example && cd $_ # cd into the directory just created
$ npm init --yes
$ npm install --save express axios reify
Here is the server, proxying all requests to the http://perdu.com backend, after adding a random header:
// server.js
import uuid from 'uuid';
import axios from 'axios';
import express from 'express';

const port = process.env.NODE_PORT || 3000;
const baseURL = process.env.PROXY_HOST || 'http://perdu.com/';

const client = axios.create({ baseURL });
const app = express();

app.get('/', (req, res) => {
    const requestOptions = {
        url: req.path,
        method: req.method.toLowerCase(),
        headers: { 'X-Random': uuid.v4() },
    };

    return client(requestOptions).then((response) => res.send(response.data));
});

app.listen(port);
console.log(`Proxy is running on port ${port}. Press Ctrl+C to stop.`);
Tips: Did you notice how I used environment variables via process.env? It's central to my point, keep it in mind for later.
A small makefile to run the server:
start:
    # reify is a small lib to fully support import/export without having to install the babel suite
    node --require reify server.js
The server is runnable on local environment, it's all good, "it works on my machine™":
$ make start
> Proxy is running on port 3000. Press Ctrl+C to stop.
Building an Artifact
Now let's ship this code to a staging environment, in order to test it in somewhat real conditions.
At this point, it's a good idea to freeze a version of the code (with a Git tag or a GitHub release for instance).
The simplest way to prepare the deployment is to build a zip file with the source code and all its dependencies. I'll add the following target to the makefile, creating a zip with the identifier of the latest commit:
build:
    mkdir -p build
    zip 'build/$(shell git log -1 --pretty="%h").zip' Makefile package.json -R . '*.js' -R . '*.json'
And it works:
$ make build
$ ls build/
> 4dd370f.zip
The build step is simplified here, but on real projects it can imply a bundler, a transpiler, a minifier, and so on. All these lengthy tasks should be done at the build step.
The resulting zip file is what we can call an artifact. It can be deployed on an external server, or be stored in a S3 bucket for later usage.
Tips: Once you find the build process that fits you, automate it! Usually, a Continuous Integration / Continuous Delivery (CI/CD) system like Travis or Jenkins runs the tests, and if they pass, build the artifact in order to store it.
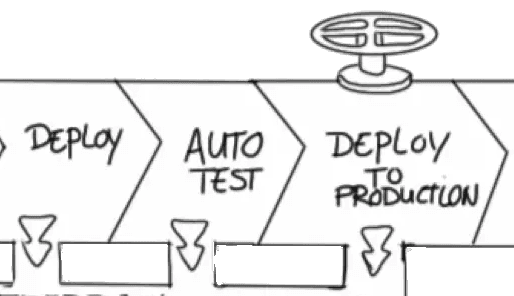
Deploying the Artifact
To deploy the artifact, just copy this file on the server, extract it, and run the code. I automate it again as a makefile target:
TAG ?=
SERVER ?= proxy-staging

deploy:
    scp build/$(TAG).zip $(SERVER):/data/www/deployment-example/
    ssh $(SERVER) " \
        cd /data/www/deployment-example/ \
        unzip $(TAG).zip -d $(TAG)/ && rm $(TAG).zip \      # unzip the code in a folder
        cd current/ && make stop \                          # stop the current server
        cd ../ && rm current/ && ln -s $(TAG)/ current/ \   # move the symbolic link to the new version
        cd current/ && make start \                         # restart the server
    "
    echo 'Deployed $(TAG) version to $(SERVER)'
I use environment variables to specify the tag I want to deploy:
$ TAG=4dd370f make deploy
> Deployed 4dd370f version to proxy-staging
As you can see, the deployment is actually very fast, because I don't need to build in the target environment.
Tips: That means that if the build contains binaries, they must be compiled for the target environment. To simplify, it means you should develop your code on the same system as you run it. It's simpler that it sounds once you use Vagrant or Docker.
I used the ssh command without any credential arguments. You don't want those credentials in a makefile, so I advise to use your local ~/.ssh/config to save them. This way, you can securely share them with your co-workers, and keep these credentials outside of the repository - while having the deployment instructions in the the Makefile. Here is an exampe SSH configuration for my proxy-staging:
Host proxy-staging
    Hostname staging.domain.me
    User ubuntu
    IdentityFile ~/.ssh/keys/staging.pem
Deploying to Several Environments
The server can now run in the proxy-staging server, with the default configuration. What if I want to deploy the same build to a proxy-production server, but with a different port?
All I need is to be sure that wherever the code runs, the NODE_PORT environment variable is set to the correct value.
There are many ways to achieve this configuration.
The simplest one is to directly write the values of the environment variables in a ~/.ssh/environment file in each server. That way, I don't need to remember how or when to retrieve the configuration: it's loaded automatically each time I log into the machine.
> ssh production-server "echo 'NODE_PORT=8000' >> ~/.ssh/environment"
> ssh production-server "echo 'PROXY_HOST=https://host.to.proxy' >> ~/.ssh/environment"
> ssh production-server
> env
NODE_PORT=8000
PROXY_HOST=https://host.to.proxy
Now I can deploy to proxy-production the same artifact that I've used for proxy-staging, no need to rebuild.
$ TAG=4dd370f SERVER=proxy-production make deploy
> Deployed 4dd370f version to proxy-production
That's it.
Tips: The rollback is as simple as a deployment of the previous artifact.
At this point, it is easy to automate the process: let the CI build an artifact each time a PR is merged, or on every push to master (Travis, Jenkins, and every other CI allow to implement a build phase). Then, store this build somewhere with a specific tag, such as the commit hash or the release tag.
When somebody wants to deploy, they can run a script on the server that downloads the artifact, configures it thanks to the environment variables, and runs it.
Tips: If you don't want to write your environment variables on every production server you have, you can use a configuration manager like comfygure. Disclaimer: We wrote it!
When You Should Use Artifact-Based Deployment
Artifact-based deployment comes with many advantages. It is quick to deploy, instant to rollback, the backups are available and ready to run.
It allows to run the exact same code on every environment. In fact, with artifacts, the deployment becomes a configuration issue. If a bunch of code works on staging, there is no reason that it should fail on production, unless there is a mistake in the configuration - or the environments aren't the same. For that reason, it's a good idea to invest in a staging environment that strictly equals the production environment.
Feature flagging is also easier with such a deployment process: just check the environment variables. And last but not least, the deployment can be automated to such an extent that it can be done by a non-technical person (like a product owner). We do it, and our customers love it.
But automating such a process comes with a substantial cost. It takes time to install and maintain, because when the build process involves more than just zipping a few files, you need to run it with a bundler like Webpack. Also, consider the extra disk space necessary to store the artifacts and the backups.
Tips: Use environment variables, do not check the environment. Try to find instances of if (env !== 'production') in your code, and replace them with a significant environment variable, like if (process.env.LOGGING_LEVEL === 'verbose').
No need of such a deployment process for a proof-of-concept, an early project, or a solo developer. All the advantages come with a team working on a mature project.
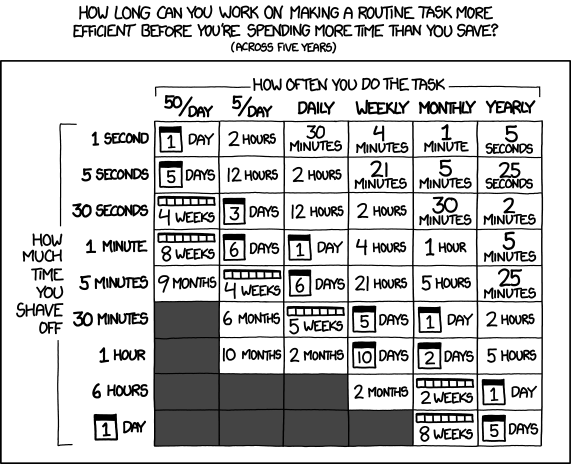
Ask yourself how many time you spend on deployment, and take a look at this chart!
Frequently Asked Questions
My project is an SPA / PWA. I must configure my bundle at the build phase!
You don't have to. There is many ways to configure a Single Page Application later in the process. For instance, load a config.json at runtime from a different location than the other static assets. Or, write a window.__CONFIG__ with server side rendering.
Don't be afraid to display the frontend config, it'll be easier to debug. If you have sensible informations in your frontend configuration hidden in your minified and cryptic webpack build, you're already doing it wrong.
What about database migrations?
Migrations don't have to run when the application deploys. They should have their own pipeline, that can be triggered at the appropriate moment. This way, you can handle each deployment on its own, and rollback any of them independently. It clearly implies to do backups a lot, and to have revertable migrations.
In case of big or painful migration, don't hesitate to do it step by step. For example, how to move a table: first create the new table, then copy the data, and finally delete the resulting table in three different migrations. The application can be deployed between the copy and the table deletion. If something goes wrong, the application can be reverted quickly without touching the database.
Conclusion
Once this process is correctly installed, deployments become quicker and safer. It allows teams and product owners to be more confident about deployments.
Artifact-based deployment is a powerful technique that is truly worth considering when a project gets close to its maturity. It matches perfectly with agile methodologies like SCRUM, even more with Kanban, and it's a prerequisite to continuous delivery.
To go further with deployment techniques, I recommend huge article of Nick Craver: Stack Overflow: How We Do Deployment - 2016 Edition.